


Videos
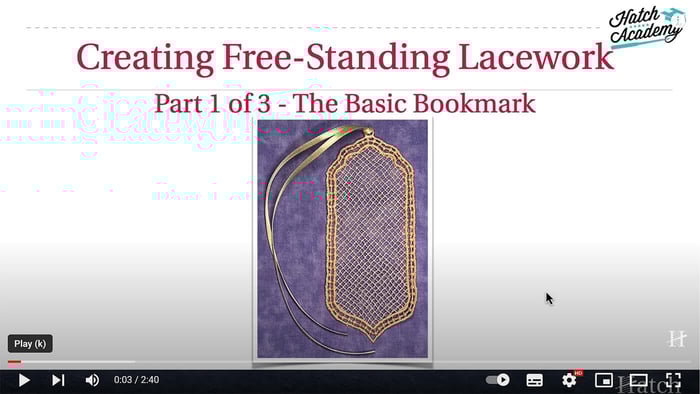
Personalizing a Free Standing Lace Bookmark
Free Standing Lace in Hatch Embroidery
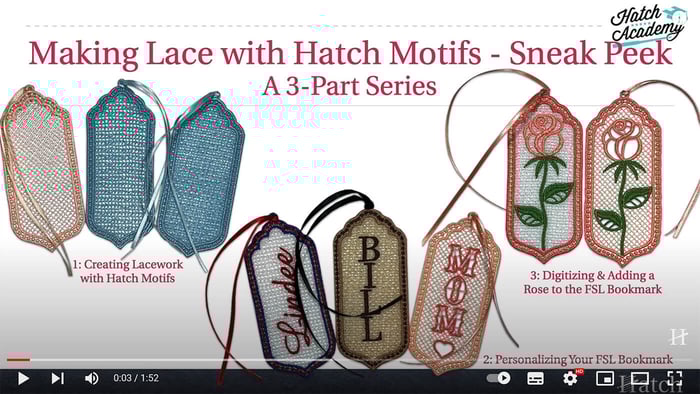
Part 2 of our 3-part Hatch Academy Course on Digitizing Lace is all about personalizing a Free Standing Lace Bookmark.
Note: This course is only available with the Academy All-Access Pass
Visit the Hatch Academy and access this course with your Academy All-Access Pass
In part 2 of the 3-part Making Lace in Hatch Academy course, you will learn how to add lettering to your lace project for a more personal touch. There are two projects included in this course, one designed for beginners, and one for advanced digitizers.
Course Topics:
- Quick & easy personalization for a simplified bookmark
- Tips for font choices
- How to lay out letters
- Rotating the letters and using Vertical Baseline
Advanced Techniques:
- Cutting out the lace behind the lettering
- Digitizing structural stitches
- Handling extreme corners in satins
- Proper sequencing for the best stitch outs
What's Included:
- A step-by-step guide to creating the bookmark
- Design files to download for your working files
- Finished files of both the simplified and advanced bookmarks
This course is available for All-Access Members only.
Purchase your Academy All-Access Pass
Lace with Hatch Embroidery software
Lace has been a popular embellishment for clothing and home decor for centuries, and with the rise of machine embroidery, creating lace designs has become easier than ever. Hatch Embroidery software is a powerful tool that allows you to create intricate lace designs with just a few clicks of a button. Here are some tips and tricks for creating beautiful lace designs using Hatch Embroidery software.
First, it's important to choose the right type of stitch for your lace design. Hatch Embroidery software offers a variety of stitch types that are suitable for lace, including satin stitch, fill stitch, and running stitch. Satin stitch is great for creating solid areas of lace, while fill stitch is ideal for creating open areas with a lacy feel. Running stitch can be used to create outlines or add texture to your design.
Once you've chosen your stitch type, it's time to start creating your design. Hatch Embroidery software offers a variety of pre-made lace designs that you can use as a starting point, or you can create your own design from scratch. If you're new to creating lace designs, we recommend starting with a pre-made design to get a feel for the software.
When creating your design, it's important to pay attention to the density of your stitches. Lace designs typically require a lower stitch density than other types of embroidery designs, so be sure to adjust your stitch settings accordingly. You may also want to experiment with different types of thread, such as metallic or variegated thread, to add extra dimension to your design.
Once you've finished your lace design, it's time to export it to your embroidery machine. Hatch Embroidery software supports a wide range of file formats, so you can be sure that your design will work with your machine. When embroidering your lace design, be sure to use the right materials and settings to ensure that your design comes out perfectly.
In conclusion, creating lace designs with Hatch Embroidery software is a fun and rewarding process that allows you to unleash your creativity and add a touch of elegance to your embroidery projects. By choosing the right stitch type, paying attention to stitch density, and experimenting with different types of thread, you can create beautiful lace designs that are sure to impress.
Related Articles
Digitizing Lace with Hatch Embroidery
Digitizing Lace with Hatch Embroidery is easier than you think. Watch this sneak peek video below of the 3...
Creating Lacework with Motifs
Creating Lacework with Motifs is part 1 of the 3-part Hatch Academy course on Digitizing Lace with Hatch...
What's New in Hatch Embroidery 3
What's New in Hatch Embroidery 3? Laydown Stitch, Keyboard Design Collection, Reef PhotoStitch, Hand Stitch, Center All Tool and so much more.