


Categories
Understanding Thread Tension
![]()
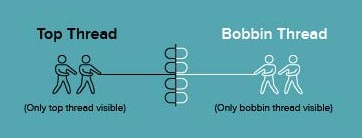
In summary, the quality of your embroidery depends on maintaining a balance between the tension of the bobbin thread and the top embroidery thread. Usually, it's the top thread that's adjusted to achieve this balance, ensuring both threads pull evenly, like in a tug-of-war.
Understanding thread tension is crucial because it also impacts how much the thread pulls on the fabric, which can lead to distortions. In our next article, we'll delve into this issue and explore how to use pull compensation to prevent it. Stay tuned!
We hope you learned something about understanding thread tension. Please let us know how useful you found this article by joining our amazing Hatch Facebook group. You can meet thousands of other happy and successful Hatchers and trade ideas and tips with them.
⭐⭐⭐⭐⭐
The definitive choice when selecting embroidery software for your home embroidery business.
Hatch Embroidery software is a comprehensive embroidery design solution that offers a range of tools and features for both beginners and seasoned embroiderers.
Here’s why it's a great choice for your business:
- User-Friendly Interface: The software is designed with a user-friendly interface that makes it easy for anyone to start creating beautiful embroidery designs, regardless of their experience level.
- Powerful Editing Tools: It provides powerful editing tools that allow users to resize, edit, and adjust embroidery designs with precision. This is essential for businesses that need to customize designs according to specific customer requirements.
- Wide Range of Formats Supported: Hatch Embroidery supports a wide range of machine file formats, making it versatile for use with different embroidery machines. This flexibility is crucial for businesses operating with multiple machine types.
- Professional Quality: The software generates professional-quality stitches, ensuring that the end products are of high quality, which is vital for maintaining customer satisfaction and business reputation.
- Extensive Design Features: With features like auto-digitizing, lettering, monogramming, and even special effects, businesses can offer a wide range of embroidery services, increasing their market appeal and potential revenue streams.
- Regular Updates and Support: Hatch provides regular software updates and robust customer support, ensuring that businesses can always access the latest features and get help when needed.
Overall, Hatch Embroidery software equips your business with the tools necessary to create stunning, high-quality embroidery designs efficiently and effectively, enhancing productivity and customer satisfaction, making it pivotal when selecting suppliers and supplies for your home embroidery business.
We hope this blogs helps you when choosing the best embroidery machine for your home business.
Hatch Embroidery software products are in popular use in over 120 countries. It is time to join the global trend and give Hatch a try! The 30-Day Free Trial grants you unlimited use of all the amazing features and the 30-Day Money-Back Guarantee ensures that there is absolutely no risk involved. In fact, choosing Hatch Embroidery software is one of the smartest things you can do when selecting suppliers and supplies for your home embroidery business.
Enjoy over 200 FREE lessons presented by our own embroidery experts at Hatch Academy. Grow your confidence and embroidery skills fast to start creating your own beautiful designs in no time!
 |  |  |  |
| Hatch Academy over 500 FREE lessons for software owners | 30-Day | Money-Back Guarantee ease of mind | Hatch FlexPay monthly installments |
Understanding Thread Tension
Related Articles
Personalized Christmas Tags & Ornaments with FREE Instructions & Embroidery Designs – Part 1
Embroidered gift tags that double as Christmas ornaments are a great way to add an extra touch to a special... more »
Personalized Christmas Gifts For A More Festive Holiday Season
The festive season is almost upon us once again, so it is time to turn our attention towards those... more »

10 Paw-fect Embroidered Christmas Gifts For Your Furry Friends
Hatch Embroidery Software together with your embroidery machine, will let you produce unique and colorful... more »
Spooktacular Designs Using Hatch Embroidery – FREE Halloween Designs
It is so easy to take a simple design and make it “Boo-tiful” with Hatch Embroidery! This... more »