


Categories
Feature Focus: Hatch Auto-Digitizing Tools
![]()

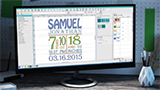
Embroidery has come a long way from being a traditional craft to a digital art form, thanks to advancements in machine embroidery technology. One such innovation is the auto-digitizing tools offered by Hatch Embroidery software, revolutionizing the way designs are created. Just with a few simple clicks you can turn your graphics into embroidery designs. One of the advantages of Hatch Auto-Digitizing is that it has different tools depending on the type of artwork you have and the outcome you want. In this blog post, we'll delve into the benefits of these tools, how to use them effectively, and why they are a game-changer for both hobbyists and home business embroiderers.
Understanding Auto-Digitizing Tools
Auto-digitizing tools are designed to convert digital images or artwork into embroidery designs with a few clicks. This process involves the software analyzing the image and generating stitches based on various parameters such as color, density, and stitch type. Hatch Embroidery, a leading software in the industry, offers powerful auto-digitizing features that simplify the design process and open up a world of creative possibilities.
Using Good Quality Artwork is Important
It is very important to mention that good quality artwork will result in superb results, while mediocre artwork where the lines are blurred and multiple colors are blended can result in inferior outcome. Artwork should be optimized for use with Auto-Digitizing. It should be a simple, clear image, few colors, not shaded colors, and crisp outlines. Artwork with many colors and lots of individual pieces (or noise), in the artwork or a large file size should be optimized in a graphics program before opening in Hatch.

Benefits of Hatch Embroidery Auto-Digitizing Tools
- Time-Saving: One of the biggest advantages of auto-digitizing tools is their ability to save time. Traditional embroidery digitizing can be a complex and time-consuming task, especially for intricate designs. With auto-digitizing, the software does the heavy lifting, allowing you to focus on other aspects of your project.
- User-Friendly Interface: Hatch Embroidery's interface is designed with user experience in mind. The auto-digitizing tools are intuitive and easy to navigate, making them accessible to beginners while offering advanced options for seasoned embroiderers.
- Versatility: Whether you're working on a logo, a piece of art, or a photograph, auto-digitizing tools can handle a wide range of input files. This versatility gives you the freedom to explore different design ideas without limitations.
- Customization: While auto-digitizing generates designs automatically, Hatch Embroidery provides extensive customization options. You can adjust stitch settings, change colors, add text, and fine-tune details to achieve the desired look for your embroidery project.
- Consistency: Auto-digitizing tools ensure consistency across multiple designs. Once you have set your preferences and parameters, the software applies them uniformly, maintaining quality and precision throughout your work.
When & How to Use the Specific Auto-Digitizing Tools Offered by Hatch Embroidery
Auto-Digitize Instant Embroidery
Description: Auto-Digitize Instant Embroidery allows you to quickly convert simple images or clipart into embroidery designs with minimal manual input.
When to Use: This tool is ideal for converting basic designs, logos, icons, or simple artwork into embroidery quickly. It's great for beginners or when you need a fast solution for straightforward designs.
Auto-Digitize Embroidery
Description: Auto-Digitize Embroidery is a more advanced tool that offers automated digitization of designs while giving you more control. It analyzes the image or artwork and generates stitches based on defined parameters.
When to Use: Use Auto-Digitize Embroidery when you want more control of automated digitization of designs. It's suitable for designs with multiple colors, gradients, and varying stitch types.
Click-to-Fill
Description: The Click-to-Fill tool is used to automatically fill a specific enclosed area with stitches. It analyzes the shape and creates a fill stitch pattern within that area.
When to Use: Use click-to-fill for solid or semi-solid areas in your design, such as backgrounds, shapes, or large elements that require a consistent fill pattern.
Click-to-Fill without Holes
Description: This tool is similar to click-to-fill but ensures that areas with holes or gaps are filled without leaving spaces in the design.
When to Use: When your design has areas with internal holes or gaps (like letters with holes in them), use click-to-fill without holes to ensure a continuous fill pattern without interruptions.
Click-to-Turning Fill
Description: Click-to-turning fill is designed for areas with directional changes or curves. It automatically adjusts the stitch direction to follow the contours of the shape, resulting in smoother fills.
When to Use: Use click-to-turning fill for curved or irregular shapes where traditional fill stitches might not align perfectly. This tool ensures that the stitches flow smoothly along the shape's edges. It is recommended to use this with lettering and turning column shapes.
Click-to-Outline
Description: The Click-to-Outline tool creates a satin stitch or running stitch outline around both the inside and outline edge of a selected shape or object.
When to Use: Use click-to-outline to define the edges of your design elements, add borders, or create outlines for text or complex shapes. Satin stitches give a smooth, polished look, while running stitches offer a more open and textured outline.
Click-to-Centerline
Description: This tool generates a single-line stitch, also known as a centerline or motif stitch, along the center of a selected shape or object.
When to Use: Use click-to-centerline for decorative purposes, such as creating intricate designs, outlining details within larger elements, or adding embellishments like vines, ropes, or special effects.
There are more tools included in the Auto-Digitize toolbox, namely Color PhotoStitch, Reef PhotoStitch and PhotoFlash. We will feature these in a separate blog in the future.
How to Use The Auto-Digitizing Tools
- Import Your Design: Start by importing the image or artwork you want to digitize into the Hatch Embroidery software. Ensure that the image is clear and high-resolution for better results.
- Select Auto-Digitize: Navigate to and open the Auto-Digitize toolbox within the software.
- Select the Tool: Choose the appropriate auto-digitizing tool based on your design needs (e.g., click-to-fill, click-to-outline, etc.).
- Define the Area: Click or drag to define the area or shape where you want the tool to apply.
- Adjust Settings: Depending on the tool, you may have options to adjust parameters such as stitch type, density, angle, and color.
- Preview and Fine-Tune: Review the generated stitches in the software's TrueView mode. Make adjustments as needed to ensure the desired look and functionality.
- Save and Export: Once satisfied, save your design and export it in a compatible file format for your embroidery machine.
- Stitch Out Your Design: Transfer the finalized design to your embroidery machine and stitch it out on your chosen fabric. Pay attention to hooping techniques, thread tension, and machine settings for optimal results.
By understanding the strengths and applications of these auto-digitizing tools within Hatch Embroidery, you can enhance your design capabilities and create professional-quality embroidery projects with precision and ease. Experimenting with different tools and techniques will also help you discover creative possibilities and refine your embroidery skills.
Tip: Use your kids' drawings as artwork and have fun with the Hatch auto-digitizing tools turning them into memorable embroidery designs.

Learn More
Online User Guide
Learn more about Auto-Digitizing.
Hatch Academy
Make sure you are logged into Hatch Academy before clicking the links below!
FREE Courses:
- Getting started with Hatch 3: Part 3 Digitizing methods in Hatch Embroidery
- Auto-Digitizing Techniques HJ-07-01
- Hatch Toolboxes HT
- Getting Started with Hatch 3
Projects (Available with All-Access Pass):
- Penguin Design or Ornament & Towel Project
- Auto-Digitizing & Coloring a Line art Design AA-03
- Digitizing the Rose – Basics
- Christmas Wreath
- Auto-Digitizing a Free Standing Holly Leaf PS-16-03
FREE Design
You can download the 'Keeping it Reel' free designs by clicking the button below. This design was created using auto-digitizing tools in Hatch Embroidery. It is perfect for Father's Day or for a friend who loves fishing.


Hatch Embroidery software products are in popular use in over 120 countries. It is time to join the global trend and give Hatch a try! The 30-Day Free Trial grants you unlimited use of all the amazing features and the 30-Day Money-Back Guarantee ensures that there is absolutely no risk involved.
Enjoy over 200 FREE lessons presented by our own embroidery experts in Hatch Academy. Grow your confidence and embroidery skills fast to start creating your own beautiful designs in no time!
 |
 |
 |
 |
| Hatch Academy over 200 FREE Lessons |
30-Day FREE Trial |
Money-Back Guarantee ease of mind |
Hatch FlexPay monthly instalments |
Related Articles
Unlocking the Power of Laydown Stitch for Perfect Embroidery
You will be familiar with the struggle of creating intricate designs that get lost in textured fabrics... more »

Feature Focus: Hatch Layout Tools
Welcome to another edition of the Hatch Embroidery Feature Focus: Hatch Layout Tools, where we delve into... more »
Crafting Artisanal Charm with the Hand Stitch Effect
Here at Hatch Embroidery we continue to push the boundaries of creativity. The Hand Stitch effect brings... more »

Unlock Creative Lettering with Hatch Embroidery
Imagine a world where your embroidery projects are not just stitched but tell a story with every letter.... more »